
If you’ve ever finished a print only to discover the base is slightly wider than the rest of the model, you’ve encountered elephant’s foot.
In 3D printing, elephant’s foot refers to the outward bulging of the first few layers of a print, making the bottom wider than intended. It might seem like a small issue, but when you’re printing parts that need to fit together precisely, that extra fraction of a millimetre can cause serious frustration.
In this guide, we’ll unpack what causes elephant’s foot, how it affects dimensional accuracy, and most importantly — how to eliminate it for clean, professional results.
What Is Elephant’s Foot in 3D Printing?
Elephant’s foot is a common first layer printing defect where the bottom layers of a model flare outward. The name comes from the way the base resembles the foot of an elephant — slightly wider and bulging compared to the rest of the body.
This issue is especially problematic when printing:
- Functional parts that must fit into other components
- Mechanical assemblies
- Press-fit or snap-fit designs
- Calibration models
Even a slight base expansion can throw off tolerances and compromise your print quality.
What Causes Elephant’s Foot?
Elephant’s foot is almost always related to first layer settings, heat management, or bed adhesion adjustments. Let’s break down the main culprits.
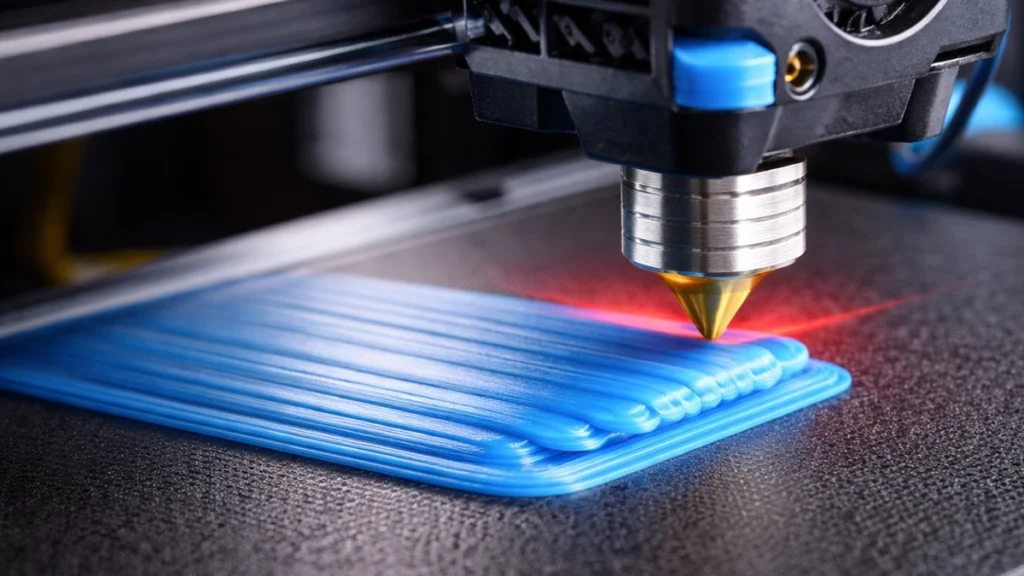
1. Nozzle Too Close to the Bed (Incorrect Z-Offset)
This is the most common cause.
If your nozzle is set too close to the build plate, the filament gets overly compressed. Instead of forming a neat, slightly squashed line for good adhesion, the molten plastic has nowhere to go — so it spreads outward.
That outward spread becomes permanent once the layer cools.
Signs this is your problem:
- Extremely squashed first layer lines
- No visible gap between extrusion lines
- A glossy, almost smeared first layer
- Difficult part removal from the bed
Correct Z-offset calibration is critical to avoiding elephant’s foot while still maintaining proper adhesion.
2. Excessive Bed Temperature
A heated bed is essential for good adhesion — especially when printing materials like PLA, PETG, or ABS. But if the bed temperature is too high, the bottom layers remain soft for too long.
As upper layers are added, their weight compresses the still-soft base. The plastic shifts outward slightly, creating that unwanted bulge.
This is particularly noticeable when:
- Printing tall parts
- Printing dense or solid models
- Using materials that soften easily at elevated temperatures
Reducing the bed temperature after the first few layers can dramatically reduce elephant’s foot.
3. Weight and Insufficient Cooling
Even if your first layer looks good initially, poor cooling can allow deformation to happen later in the print.
If the lower layers don’t fully solidify before additional layers are added, gravity and accumulated weight can cause compression. This leads to subtle outward expansion at the base.
Cooling is especially important in:
- Large footprint prints
- High infill percentage parts
- Slow-printing materials
Optimising your part cooling fan settings helps prevent first layer deformation.
4. Poor First Layer Calibration
Sometimes the issue isn’t just one setting — it’s the overall first layer setup.
Incorrect combinations of:
- First layer height
- First layer flow rate
- Bed levelling
- Extrusion multiplier
can all contribute to base expansion.
Proper bed levelling and first layer calibration are foundational to eliminating elephant’s foot in 3D printing.
Why Elephant’s Foot Is a Bigger Problem Than It Looks
At first glance, elephant’s foot might seem cosmetic.
But in reality, it affects:
Dimensional Accuracy
Even a 0.2–0.4 mm flare can prevent parts from fitting together properly.
Assembly Tolerances
If you’re printing interlocking parts, gears, or enclosures, the widened base can stop parts from seating correctly.
Professional Finish
For customer-facing prints or retail products, a visible base bulge reduces perceived quality.
If you’re running prints for clients or selling functional components, eliminating elephant’s foot should be a priority.
How to Fix Elephant’s Foot (Step-by-Step)
The good news? Elephant’s foot is completely fixable.
Here’s how to eliminate it effectively.
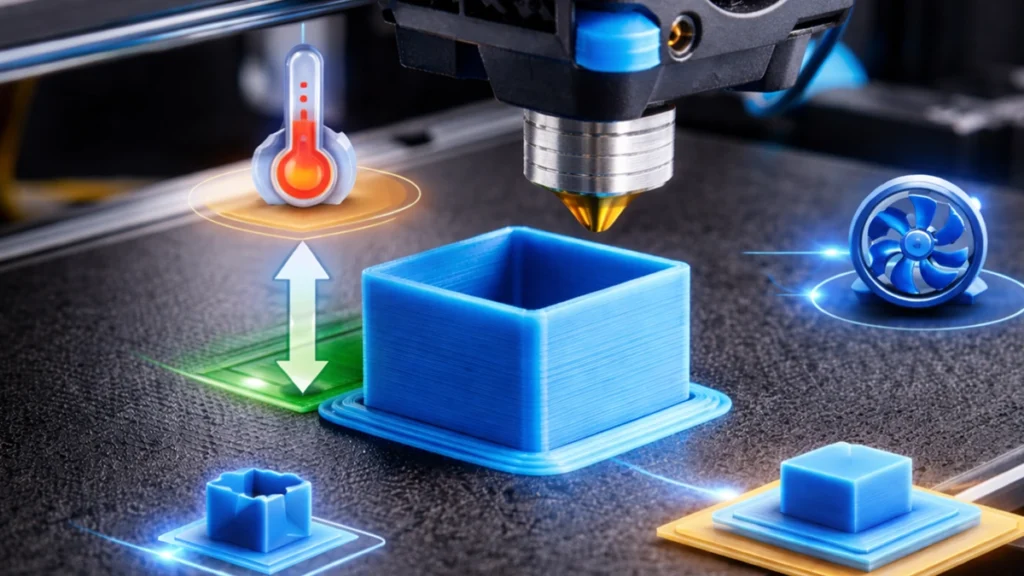
1. Adjust Your Z-Offset
Start here.
Lower your nozzle slightly if adhesion is poor — but avoid excessive squish. You want:
- Smooth lines
- Slight flattening
- Visible separation between lines
- No “pancaked” extrusion
Run a first layer test print to dial this in perfectly.
Correct Z-offset calibration alone often solves the problem.
2. Reduce Bed Temperature After Initial Layers
A great technique is to:
- Use your normal bed temperature for the first 2–5 layers
- Then reduce it by 5–10°C
This allows the base to solidify sooner while maintaining adhesion during the critical first layer.
Most slicers allow temperature changes at specific layer heights.
3. Enable Elephant’s Foot Compensation in Your Slicer
Many modern slicers include elephant’s foot compensation settings.
This feature slightly shrinks the first layer perimeter to counteract outward expansion. It’s a smart digital fix that works especially well for precision parts.
Look for settings like:
- Initial layer horizontal expansion
- Elephant foot compensation
- First layer size adjustment
Apply small adjustments (e.g. -0.1 mm to -0.3 mm) and test.
4. Improve Cooling Settings
Ensure your part cooling fan activates properly after the first layer.
For materials like PLA:
- 100% cooling after layer 2 or 3 is common
For PETG or ABS:
- More moderate cooling may be required
The goal is to solidify lower layers quickly without compromising adhesion.
5. Use a Raft or Brim (When Necessary)
If dimensional precision is critical, consider printing with:
- A raft
- A brim
These create a sacrificial layer that absorbs any deformation.
Instead of your part expanding outward, the raft takes the hit. Once removed, your model retains accurate dimensions.
This is particularly useful for engineering prints or tight-tolerance components.
Preventing Elephant’s Foot in Future Prints
Prevention is always easier than correction.
Before starting a print, check:
- Bed level is accurate
- Z-offset is calibrated
- Bed temperature is appropriate for the material
- Cooling settings are optimised
- First layer flow rate is not excessive
Taking five minutes to confirm these settings can save hours of reprints.
Material-Specific Tips
PLA
- Moderate bed temperature (50–60°C)
- Strong cooling after first layers
- Avoid excessive squish
PETG
- Slightly lower bed temp after first layers
- Controlled cooling
- Be cautious of nozzle being too close
ABS
- Balanced bed temperature
- Avoid overheating lower layers
- Ensure enclosure temperature isn’t excessive
Different materials react differently to heat and compression, so fine-tuning is essential.
Final Thoughts: Precision Starts at the First Layer
Elephant’s foot is one of the most common 3D printing issues — but also one of the easiest to fix once you understand the cause.
In most cases, it comes down to:
- Excessive first layer squish
- Bed temperature too high
- Insufficient cooling
- Minor slicer adjustments
By properly calibrating your first layer, adjusting bed temperatures, and using elephant’s foot compensation where necessary, you can eliminate base bulging while maintaining strong bed adhesion.
Remember: a perfect print starts with a perfect first layer.
If you’re aiming for cleaner finishes, tighter tolerances, and professional-quality results, dialling in your first layer setup is non-negotiable.
Happy printing — and may your bases stay sharp, straight, and elephant-free.
